


Are you trying to signup for Digitize India but encountering an error saying “Aadhaar Authentication not Successful”?
Then you are in the right place.
Well as you Know that Digitize India is a Government Initiative by which you can be a Digital Contributor and earn money doing simple Data Entry Jobs.


You may be thinking How much can you earn with Digitize India per month? Well, If you work 6-8 Hours of Dedicated time per day, and have good typing speed, Accuracy then you can expect to earn around ₹5000-1000 per month.
It is a decent amount of money you get for working in your spare time, isn’t it?
Well here is the thing – You do not need any qualification to Enter in Digitize India, and that may be a good thing for some people, but it results in more people to Register for this platform.
Because there are more people and fewer jobs so Digitize, India is showing “Aadhaar Authentication Not Successful.”
But Don’t worry as Today I am going to show you how you can fix this problem easily.
So without further ado, let’s get started.
Solve Aadhaar Authentication Not Successful

1. Head over to Digitize India Official Website.


2. Click on the Register Now button which will take you to Account Registration Form to sign up as a Digital Contributor.

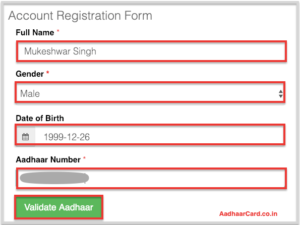
3. Fill in your Full Name, Gender, Date of Birth and Aadhaar Number in their respected boxes and click on Validate Aadhaar.


4. Unfortunately, it will show “Aadhaar Authentication Not successful” again and again, it doesn’t matter how many times you try.
Note – All the other fields like username, password, etc. are disabled and will only open after Validation of Aadhaar. Since we are not able to Validate it, therefore we will go the easy way.
P.S. – Now all the below process is more interesting so think your self as a Hacker or programmer and get ready for the exciting thing.

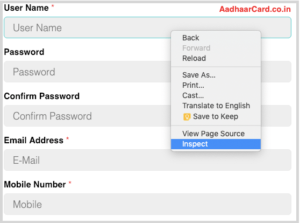
5. Right Click on User Name Field(Which is Locked) and Click on Inspect Elements and on the right side, you will see some HTML in blue color (as in the picture below).

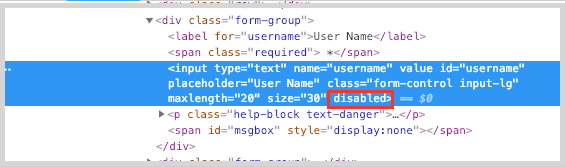
6. At the end of that code, you can see the word “disabled.” Double-click on the “disabled” word, delete it(By Backspace) and press Enter.
Note – Only delete the “disabled” word and nothing else.
After deleting the “disabled” word, you will see that the Username Field is unlocked and you can enter your username.
Repeat Step 5 and Step 6 for other fields like Password, Confirm Password, Email Address, and Mobile Number as the steps are the same.

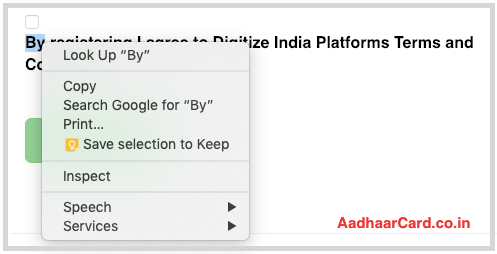
7. The Checkbox is a little confusing because you cannot right click on it. Well, Right Click on the “By” below the box and click on Inspect Elements.

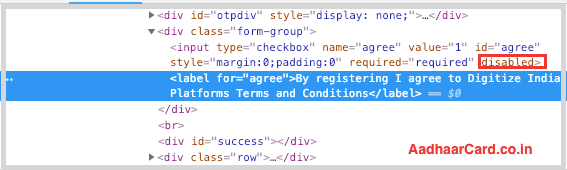
8. Above the Blue Color line, you will see “disabled”(marked above), Double click on it and Delete it then press enter.

9. Right Click on the Register Now Button and Click on Inspect, but this time you will see a slight difference, there is only one line in Blue(see below).

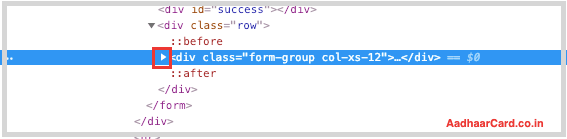
10. Click on that White color Arrow-marked in the picture above which will open up that code(see below).

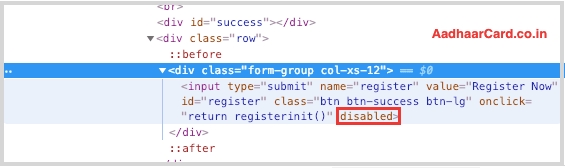
11. Now you will see Disabled word, Double Click on it, Delete It and press Enter.
After Enabling all the Locked fields, you can write your Information and can sign up for Digitize India Platform Easily.
Conclusion
In this Article, I shared How you can easily solve the problem of “Aadhaar Authentication not Successful” which you encounter while signing up for Digitize India Platform. After applying the solution, you can easily Register for Digitize India. If you like this Article, then please share it among your family, and if have any queries then do comment it below.