Update Aadhaar Number, Name, DOB, Gender Mismatch In EPF UAN Portal
UAN Gender Not Available | Aadhar Number Mismatch | EPF UAN | Update DOB, Name – Get complete procedure of updating personal details in EPFO database, step by step tutorials with graphics. Also, get the answers to other queries like – aadhaar authentication failed for epf, linking KYC details, How to link Aadhaar Card number with EPF UAN, How to update bank account number and PAN card number, how to update gender in uan profile, how to change date of birth in epf uan portal.
One can update the KYC information for his/her EPF account online by using the facility provided by EPFO named “UAN EPFO portal”.
The procedure of updating or correction into KYC (Know your customer) details, begins with a UAN (Universal Account Number) credential which is a must.
The process can be done by going to the UAN portal after that the members have the options to update their KYC details by uploading required documents online.
The KYC is a bunch of different documents include Aadhaar card, PAN card, bank account details & other.
The members who didn’t update their details on the EPFO portal yet, we highly recommend to do it as soon as possible.
Contents
How to update KYC for EPF UAN Online?
❶ Open your browser and go to the official EPF UAN Portal.
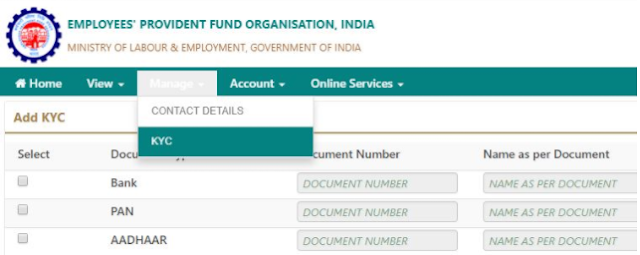
❷ Make yourself logged in by using your UAN credentials. When you’re on the main page of the UAN portal, Go to the main menu and click on the “MANAGE”, a drop-down menu will now appear, now select “KYC”.

❸ Now you will see a different page on your screen including different sections that you can update like: Bank Details, PAN, Aadhaar etc. Select your desired section you want to update.
❹ Now fill in the selected field on the portal with the required information. The KYC status will be shown as pending until the employer approved those details.
❺ After, the employer approved the updates/changes, the status that was showing the “Pending Status” will be changed to “Approved by employer”.
❻ Once the status is approved you will receive an SMS (contains approval status and some other details) sent by EPFO onto your registered mobile number.
Benefits of Linking KYC Details with EPF UAN Portal
✓ The withdrawal or transfer of money will become much easy for EPFO. So, there will be less possibility to face any kind of issues.
✓ Linking of bank account details with EPF UAN portal can make your claim out of the rejected list.
✓ The SMS alert (included your pf account details) by EPFO will be sent to your register mobile number if KYC documents are submitted.
Following documents are considered for KYC –
|
AADHAR
|
PAN Card
|
|
Passport
|
Bank Account Number
|
|
National Population Register
|
Driving License
|
|
Ration Card
|
Election Card
|
Unable To Upload KYC Details In EPF UAN Portal
In previous time the employee didn’t know the procedure of linking the KYC details with UAN number.
So, to make the process much easy for employees the Employee Provident Fund Organisation (EPFO) launched EPF Unified Portal.
But, the new portal came with some issues as well, the employees didn’t find the options to add the missing details like Name, aadhaar number, DOB, date of joining & gender details.
So, after so many complaints the EPFO has introduced a system to add missing details of employees in EPF portal.
The employees cannot able to activate or link their KYC details with their UAN. If, the employee did not upload his/her missing details in the official EPFO portal.
Employer’s Approval For Details Mismatch In EPF Portal
The role of the employer sometimes can be important and sometimes cannot.
just like the Withdrawal Without Employer Signature where the EPFO completely removed the role of an employer.
But, in order to update your missing or personal details in EPF UAN portal, the role of an employee is big & you can not update your details without your employer’s approval.
The employee can update his/her Bank account number, Aadhar number, PAN number after login into official UAN portal after that employer’s digital signature will be used to approve the updated details.
EPF Aadhar Number, PAN, DOJ, DOJ, Gender Details Mismatch
The details that are missing of employees have to be uploaded by their employer’s into the EPFO employer portal.
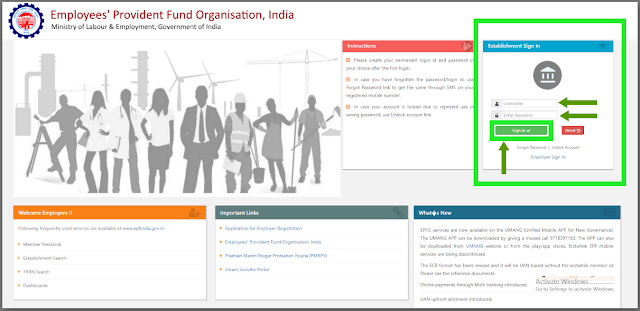
➤ The first step is to log in to official EPF employer portal, When you’re on the main window of that portal, at the right side you will see a section for login where the employer has to fill in his/her user id and password.

➤ When the employer is successfully logged in, the next step is to find the employee’s profile by using his/her UAN number (given by the employee).
➤ After selecting employee’s profile, find & click on the missing details section where the employer can easily see which details of the employees are missing in the official portal so the employer can do the further process of adding the missing details.
➤ Now, after the employer filled in the missing sections of the employee details, the employer has to approve these details in the section named “approval section”.
➤ Before hitting the approve button, the employer can double check the details by seeing the PDF file of the details that employer has just filled in.
➤ Hit “Approve”
The members can follow these steps and information in order to remove the error showing that the details mismatch with Aadhar Number, PAN Number, Date of Birth, Date of Joining, Gender Details in the EPF UAN Portal.
Once You Solve The Error You Can Start Aadhar Linking Process With EPF
As we all know the previous process of linking aadhar with EPF UAN, The EPFO made it a bit more easy for all the EPF subscribers where one can link his/her aadhar with their UAN using EPFO’s e-KYC portal.
If you are not familiar with this new move made by EPFO, Let us tell you –
- Go to the official EPFO website www.epfindia.gov.in
- Now you have to search and click on to the e-KYC portal (you will find it under Online Services section)
- You will now re-direct to the e-KYC portal
- Now, look for the section named “For EPFO Members”
- Here you will see “LINK UAN AADHAR”
- Now enter your UAN and Mobile Number
- You will receive an OTP
- Enter the OTP into the respective field
- Enter your Aadhaar Number and hit “Submit”

